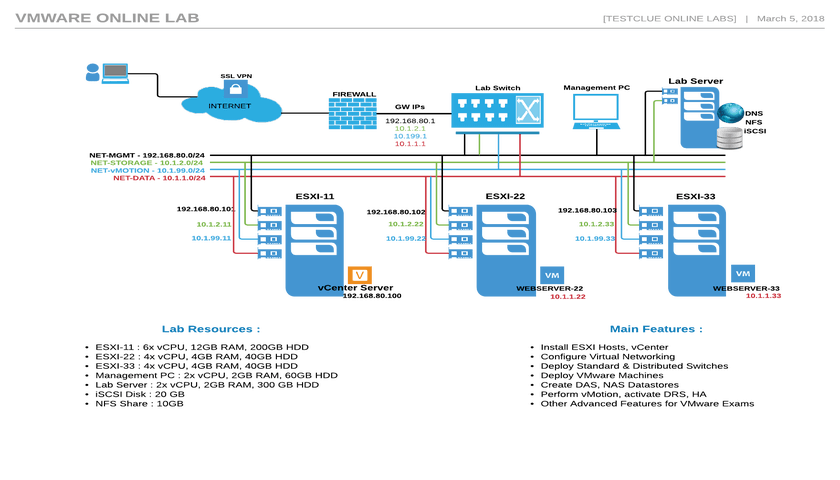
VMware lab setup tutorial is intended to help setup a small lab environment consisting of 3x ESXi hosts, one of the host from three will host vCenter and thus needs to have more resources compared to other 2 hosts. The host which will have vCenter, needs minimum 12 GB RAM (10 GB for vCenter and 2GB on ESXi for other virtual machines) and 6x vCPUs. Each ESXi host will have four network interfaces, management, storage, vmotion and data (refer to downloadable diagram below), each ESXi will be able to connect to network based storage targets (iSCSi and NFS shares). This VMware lab setup is available for rent on testclue hardware, for booking a session please click here.
ESXI Host Setup (more instructions in Useful Links Section):
- On each ESXi host interface vmnic0 is for mgmt, vmnic1 for storage, vmnic2 for vmotion and vmnic3 for data network.
- ESXi hosts are already up and running.
- First you will connect to Windows management PC (login – labuser/Labroot12!@)
- From PC connect to each ESXi host via browser (FQDNs provided on this page below) (login – root/Labroot12!@)
- IP addressing for network interfaces is available in downloadable diagram.
vCenter Setup :
- Download vCenter here (60 days free trial, a copy of vCenter installer is already saved on lab PC)
- Above download has to be made on Windows management PC
- Download the ISO image, open it as CD, and find folder named vcsa-ui-installer
- Start installation by launching installer.exe from win32 folder.
- Follow the guided step-by-step installation process, ESXi server could be used as NTP source as well or any NTP source of your choice.
- IP addresses needed are available in attached diagram
- This setup will be in 2 phases, and needs right information otherwise it will fail, setup takes time.
- DNS server IP to be used is 192.168.100.5
- Use thin disk allocation to avoid reserving all available disk space.
Storage Connection :
- iSCSI and NFS Share targets are on server – 10.1.2.5
- You will need to add to targets using HBA connections (in storage configuration of ESXi or vCenter)
- Each ESXi host must have VMK interface created (as per diagram on this page), and assigned 10.1.2.x IP and uplinked to vmnic2 for accessing storage.
Child VM Setup :
- Install 1x VM on each ESXI host
- IP addressing available in attached diagram
- ISO images for child VMs could be downloaded from here, along with other useful software.
- The image to be used is : turnkey-wordpress-14.2-jessie-amd64.iso
- Allocate 256 MB RAM and 1x vCPU to this VM
- On successful installation, you will be able to access website home page via Windows mgmt PC
Lab Information and Instructions :
If you have booked server time already please login to Lab Console below, credentials delivered via email used during booking. For booking new time slot, click here.
- connect via above link, login with emailed user/pass
- second level of authentication, as sent via email
- list of devices will be displayed to connect – windows, esxi, vcenter
- connect to Windows 7 pc from listed connections, connect as – labuser / Labroot12!@
- ESXI login details – root / Labroot12!@
- vCenter login -root, administrator@testclue.local / Labroot12!@
- please user root or administrator as users and Labroot12!@ for any other vmware devices you deploy
- lab will be auto-destroyed after 10 minutes from end of session
Device FQDNs (all available from Windows 7 Lab PC):
- ESXI-1 – https://ESXI-1.testclue.local
- ESXI-2 – https://ESXI-2.testclue.local
- ESXI-3 – https://ESXI-3.testclue.local
- vCenter – https://vcsa.testclue.local
- IP Addressing for VMs is available in network diagram
- DNS Server – win2k12.testclue.local (192.168.100.5)
Suggested Lab Workflow (you can use your own guide):
- Install vCenter on ESXI-1 (only this host has 12 GB RAM, other 2 ESXI hosts are each with 4GB)
- Associate all ESXI hosts to vCenter server
- Create Datacenter and cluster on vCenter
- Create a new vSwitch on each host and VMK port for vMotion (Creating new vSwitch)
- Create another vSwitch on each host and VMK for iSCSI / NFS storage (Creating NFS based Datastore)
- Create iSCSI and NFS shares using HBA adapters, storage target – 10.1.2.5 (server is pre-configured and will accept connection only from 10.1.2.x IPs of Hosts) (Creating iSCSI based Storage)
- Create another vSwitch and port group on it, uplink this one with DATA interface (as shown in diagram)
- Deploy 2 VMs, one on each ESXI host and assign IP addresses from data subnet
- Try vMotion of VMs between 3 ESXi hosts
- Delete the VMs and re-create them on NFS or iSCSi volumes
- Try vMotion again, this time it will be faster as files are on network storage
- If you used the provided image for VM, you can even install wordpress website on those VMs
- While trying the vMotion keep ping on, you will notice that there is no drop, may be increased latency during migration
- You can try HA, Fault tolerance within cluster
- For advanced practice, try to create a distributed switch and migrate all vSwitch connections to the distributed switch
- Check and Enable SSH on vCenter and ESXI hosts, use CLI commands for advanced troubleshooting, tcpdump
Useful Links :
For Troubleshooting and technical discussion please use this forum :
Issues During Lab Session
- Please use live chat option on bottom right of this page. (In case no response within 5 mins, please use option below)
- Red “Technical Support” button on top right hand corner of page is provided to open tickets and advance support.


Looking for something?
Upcoming Webinars
Tags
african virtual university
alignment
audio
Authentication
captions
cassandra
Cassandra Authentication
Codex
comments
content
css
database
database access control
distance learning
edge case
electrical engineering jobs
embeds
excerpt
F5 Lab Guide
featured image
formatting
gallery
html
image
indexing
lists
LTM Lab Guide
markup
mongodb
MongoDB Compaction
nsx
nsx controller
nsx manager
online education
online learning
post
Post Formats
read more
shortcode
standard
technical education
template
title
video
vmware